Wednesday, August 23, 2006

Embossing The Night Away

Last night, I decided to do a technique that I do not frequently try...embossing. I embossed the flowers on the cardstock. Then I embossed the flower on the metal tag...and then I embossed the edges of the tag for a antique look. Waala! An entire card created by embossing and stamps.

There were two important lessons that I learned last night:

  • After using the heating gun, the embossing liquid is hot. (Never had the "pleasure" of touching hot embossing liquid until last night..LOL!)
  • The Versimark ink really does not come off of the paper....even if you want it to.

Friday, August 18, 2006

I've been tagged

Liza from The School of Scrap tagged everyone there, so here goes...

1. If you could build a house anywhere, where would it be? Chicago
2. What's your favorite article of clothing? Burkenstock shoes
3. Favorite physical feature of the opposite sex? eyes
4. What's the last CD that you bought? Imogen Heap
5. Where's your favorite place to be? In my husband's arms
6. Where's your least favorite place to be? Work
7. What's your favorite place to be massaged? neck and back and shoulders
8. Strong in mind or strong in body? mind
9. What time do you wake up in the morning? between 6 and 6:30 am
10. What is your favourite kitchen appliance? blender
11. What makes you really angry? lying and cheating
12. If you could play any instrument what would it be? I can already play the flute.
13. Favourite colour? blue
14. Sports car or SUV? sports car
15. Do you believe in an afterlife? Yup
16. Favorite children's book? Green Eggs and Ham
17. What's your favorite season? Fall/Autumn
18. What is your least favorite household chore? laundry
19. If you could have one super-power, what would it be? To be invisible
20. If you have a tattoo what is it? Nope
21. Can you juggle? Definately..not..no
22. The one person from your past that you wish you could go back and talk to? My best friend from grade school...Dawn
23. What's your favorite day? Saturday
24. What's in the trunk of your car? Hummm...jumper cables..and I think that is it
25. Which do you prefer-sushi or hamburger? Hamburger

Tag goes to anyone who reads this blog (and hasn't already been tagged)!

Design Team Member


I have some fantastic news! I am a Design Team member for the School of Scrap. This is so exciting for me and I am thrilled that Lisa picked me along with several other outstanding scrappers. Can't wait to get started!!

Last Scrapper Standing Round 2- Update

Well, it appears that my layout was not creative enough to allow me to move on to Round 3 of the Last Scrapper Standing. It was a great opportunity and I feel great that I at least made it this far. A BIG congratulations to all those scrappers who made it to Round 3.

Friday, August 11, 2006

YEAHOOOO.....I am still standing...


Well, the results for the Last Scrapper Standing are in....and I have made it to the next round. I am sooooo excited and happy. I was preparing myself to not be chosen ....but I was...so now I get to go to the next round! YEAHOOOOOOO!

Now to come up with something great for the next round. The next challenge I have to use 13 pictures in a layout. WOW! This one is going to get interesting!

Wednesday, August 09, 2006

Last Scrapper Standing....Round One

Well, I decided two weeks ago to participate in the Last Scrapper Standing by the Effers. For round one, we had to journal on our photograph. I finished my layout last night but didn't have time to scan it in...will do that tonight. I will post my layout here after I get it posted in 2peas and on the Effer blog for the competition. Wish me luck!

I wanted to wish Lisa, Liza, and Gina from School of Scrap the best of luck in this competition. We are all entering it ....It would be great if one of us would get to the final round. Good luck to all of you...BIG HUGS!

Tuesday, August 08, 2006

Creative Uses for Ribbon

Do you sit in your scrap room and look at your ribbon and wonder what to do with it? Want to use more than one type of ribbon and a layotu but can not quite figure out how to incorporate it in a layout? Well, this layout is example of a great way to use different ribbon in one layout. By using ribbon to frame a photo, you not only are adding depth to your layout but also a bunch of different possible combinations and colors.

This layout was today's pick for layout of the day on 2ScrappyChicks.com. If you haven't already done so, why not go to 2 Scrappy Chicks today to meet some awesome talented scrapbookers. You will be glad that you did..the site is friendly and they have really great challenges to inspire you.

Thursday, August 03, 2006

Quilting in Layouts


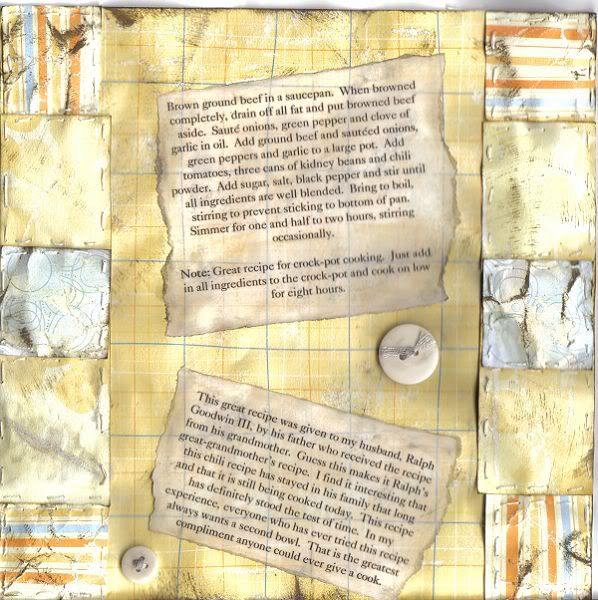
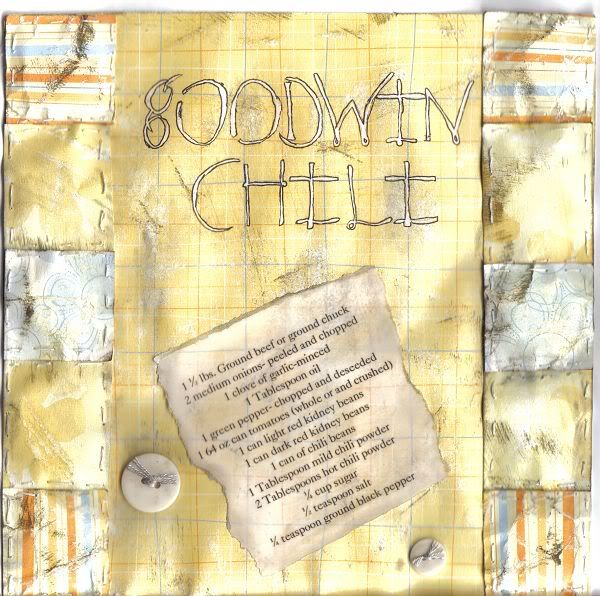
To me, one of the best techniques to try on a heritage or recipe page is quilting. Quilting adds depth to a layout as well as creating a homemade look. Adding quilting to you page is an easy task. In this layout "Goodwin Chili", the sides of the layout were quilted.

How to add quilt patches to a layout
1. First, decide where on the page
you want to add the patches.
2. Decide the type of patterned paper you want for your patches.
3. Distress the whole page of the patterned paper. NOTE: Lightly dampen your
paper and then crumble the paper up and let dry. Carefully, pull the paper apart
and then use an iron to get all big crimples out. The paper will be very soft and
clothlike at this point.

4. Cut your patches in any shape that is desired for your layout. I usually do
rectangles, triangles, and squares but any shape will work.
5. Lay your patch in the exact position on the layout and use a paper piercer to put holes through the patch and the layout under it in pairs of two. So you will
have either 2,4,6,8, etc. holes on each side of the patch.
6. Using a needle and embroidery thread (number of strands depends on the desired thickness of the stitch) start to sew around the patch using the holes that you just pierced into the paper. NOTE: When you have just one side left to stitch, STOP!
7. Cut a tiny piece of quilting batting and stuff into the patch. The amount of
batting needed depends on how full you want the patch.
8. Sew up the final one side of the patch.
9. Repeat steps 1-8 for the rest of the patches.
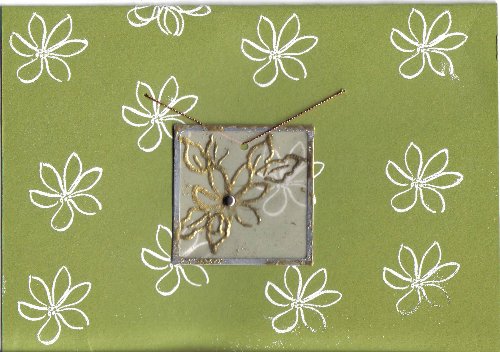
Wednesday, August 02, 2006

Double Matting Photos


One of my favorite ways to ensure that a photo stands out against patterned paper is to double matte the photos. By using contrasting but coordinating cardstock for your photo mattes, the human eye will be naturally drawn to the picture.

The possibilities are endless with the combinations you can create when matting photos.